Birds & Words

Saturday, June 20, 2015

Layering Stencil: Paint Resist


Challenge #31.  Thirty one.  Three.  One.  That is a LOT of art!!

Great technique challenge this time that lends itself to all kinds of mixed media applications.  I thought I was going to do a card then thought I'd do a tag.  I ended up doing an art journal page using my tag.

Page 47 of Compendium of Curiosities III is where you'll find simple instructions for this technique.  Inspiration Emporium is our sponsor this challenge with an incredibly generous $50 gift certificate.  The Curiosity Crew choice wins an awesome cache of crafting gear from Sir Tim Holtz and his able assistant, Mario Rossi.  Check out all the guidelines you'll want to know about to be eligible for to win on Linda Ledbetter's blog.  Be SURE to leave some love on my Curiosity sisters blogs!!  

I used Scattered Straw and Bundled Sage Distress Paints with Typo, Wildflower, Numbering, and Gothic Layering Stencils.  Victorian Velvet and Wild Honey are my Distress Ink choices.  And Vintage Photo.  Always Vintage Photo.


I was surprised and happy to find the Distress Paint resisted drips of Distress Spray Stain!!  I keep adding more and more touches of black, it looked great against the lighter, earthy colors.


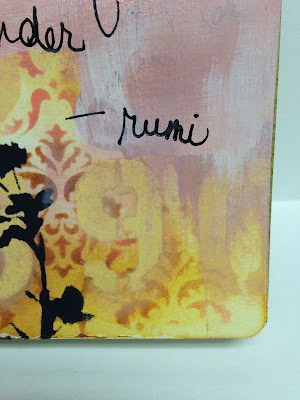
I wrote my quote on an earlier version of right page and just blew it.  The stenciling made the background too busy and the writing got lost.  


This is the best, most funnest thing about art journaling to me.  You can gesso and paint over anything.  The mistakes often make the thing that you love the most, in the end.  I found this quote which I really loved.  I've been thinking about it for a while and really appreciated this chance to use of for an art journal page.  Dina Wakley's Fude Ball pens from Ranger are so great for art journaling, they write on anything!!  Very smooth and fluid.

I hope you have FUN with this tech!!  Go get painty!!

---------------

Soooooo......  how was your week?

Mine was a little crazy.  Actually the last two weeks.  On June 8 my husband went out for a sort hike in Rocky Mountain National Park, which is about 15 minutes from our house.  I got a call from him that afternoon that he had broken his ankle and needed help.  The short story is the Park Ranger Search and Rescue team (heroes!!!!) searched for him for six hours.  Once they found him, it took them over eight hours to get him back to the trailhead where I was waiting at 2 am to take him directly to the hospital.  Surgery that afternoon and then home by 7 pm.

It is still so surreal!!  If you're interested, you can read about it here.


I didn't really get to comment on your art for the last challenge and for that I apologize.  BUT my huz is doing really, really well and will be back on the trails this year, I'm sure.  I'm getting my schedule back and I'm really looking forward to more studio time!!

Saturday, June 6, 2015

Faux Cracked Glass

Greeting, artists!!  I have to say to all of you today that I am so enormously thankful and happy to be on this journey with you.  This is Challenge #30 (what????) and each one is more fulfilling than the last.  I can't believe I get to take this ride with all of you.

I want you to know I respect you so much, that I thoroughly enjoy reading your blogs and viewing your art.

I want you to know that ALL of you are:
Our challenge today is found on page 54 of Compendium of Curiosities Volume III.  What an amazing resource this book is!!  If you don't have your own copy, you'll need that to be eligible to win either:

the bounty of prizes, donated by Tim Holtz, for our Curiosity Crew winner
OR
a generous $25 gift certificate, sponsored by Funkie Junkie Boutique, for our randomly chosen winner.

Our Honorable Mention winners tell us it makes their day, too, to have their art recognized!
I used one of Tim's Corked Glass Vials for my featured Faux Cracked Glass piece.  The technique worked beautifully here.  I tapped (not rubbed, so as not to flake away the cracked pieces) the cracked medium with my blending tool loaded with Vintage Photo Distress Ink.  Then I gave it a light spritz of water to move the color into the cracked areas.  I blotted it with a cotton cloth to remove some of the color from the outside of the vial.
I used the burlap from Tim's Textured Surfaces to cover a tag.  I bound my cracked glass vial to the tag with waxed linen and put a few sprigs of dried yarrow from our yard into it.  There are a few paper sprigs from Tim's Spring Greenery Decorative Strip Die from Sizzix and cut from Retro Grunge Paper Stash Pad, as a little extra filler.
My stamp is a brand new one, Bird Trio, from B Line Designs.  Their new release, Vintage Spring, has some gorgeous images!  I cut this image up a bit and added a sprig of flowers at the bottom right corner.  I also stamped and cut out the middle and right birds to layer and pop them up.

I used the Faux Cracked Glass technique on a Fragments square.  I colored this one with Teakwood alcohol ink.  A bit darker but it made a nice layering piece.
I LOVE these Flip Frames.  LOVE, seriously.  I rubbed Weathered Wood Distress Paint on this one with my fingers and then buffed it a little with a cotton cloth before it was dry.  Effortless, truly.  I love the shabby chic effect.  But you don't have to paint them at all, they are gorgeous as is.
I measured my hanging piece at 3 1/4 x 5 1/4.  It would have been SO smart to hang it in the frame before I did all my work on it, which I didn't!!  If I had, I would have trimmed it just a bit more at the bottom.  But it works just the same.

Grab your CC3 and go for it!  Check out Linda Ledbetter's blog for all you need to know about how to join in and don't forget to leave some love for the Curiosity Crew who, no doubt, are even now feverishly creating!


Happy creating and we'll be watching!!

Monday, May 25, 2015

Fall of 2016 - Costa Rica!!!

Sisterhood of the Traveling Paints - mixed media workshops in Costa Rica 2016


Is this happening??  Yep.  September 25 - October 1, 2016 you can join the Sisterhood of the Traveling Paints for a creative week of exploration and experience in beautiful Costa Rica!

Join Craftours with special guest educators, ANNETTE GREEN, CANDY COLWELL, CHERYL GRIGSBY, HELS SHERIDAN, LINDA LEDBETTER, MARJIE KEMPER and YVONNE BLAIR for an extraordinary event in one of the most beautiful countries in Central America.


The package includes first class hotel accommodations, airport transfers, daily breakfast, lunch and special dinners, workshops with all the educators and for a limited time airfare is FREE! Visit Craftours.com to book your space today!


Jim West has established Crafttours as the premier experience for crafters who want to combine their passion for art with the inspiration of the sounds and colors of exotic locations.  And what better location than Costa Rica for mixed media artists?


The lush greenery in Costa Rica is the perfect backdrop to the brilliant colors you will see all over the place, from the handcrafted art you'll see on your tour to the village of Sarchi and to the incredible and unique natural environment.


This trip includes seven different projects and workshops, mixed media exhibits by all the instructors, painting, photography, lectures, sightseeing tour of the Doka Coffee plantation including the butterfly sanctuary and the craft village of Sarchi, special dinners and a lot more! This tour and workshops getaway is personally escorted and organized by Craftours founder, Jim West.


Visit these blogs often to be informed as more class details become available.  Also visit the Craftours website for information about this amazing opportunity!!

Is this happening????  It sure is!!


Saturday, May 23, 2015

Eroded Metallic Altered Box

Hey CC3C artists!  I have been WAITING for this challenge.  I absolutely love this technique and I know you will, too.  There is real artistry here, a technique you can just play and play with, figuring out your timing for the steps, the amounts and methods for applying your medium, and where you are placing your effects.  So much fun!!

Turn to page 44 of Compendium of Curiosities Volume III to learn the Eroded Metallic technique.  You probably already have what you need to do it right in your studio!

As per the guidelines for our challenges, I won't give you any of the details of the technique here, but I will give you tips that helped me as I prepared the project for this challenge.  Tip #1:  There is a learning curve.  Determine to have fun with this and just play!  I knew I'd be creating an altered box, but I got myself a stack of manila tags and practiced the technique till I was comfortable with it.  I've got a bunch of tags ready to go for a future project, as well.
Am I the only one who has trouble throwing away the FABULOUS boxes that iPhones come in?  I went through my "Ready to Alter" stash and grabbed this for my project.
I cut black card stock to fit my box top.  The box measurements were kind of weird (6 15/16 long????) so I had to play with it a bit to cut a template that fit.
Ta da!  Eroded Metal.  I used Cracked Pistachio, Broken China, Faded Jeans, and Tarnished Brass Distress Paints.  Tip #2:  After working the technique, I rubbed some of the "undercooked" areas with a paper towel and got just a bit more erosion.  That may or may not help, depending on the result you have after you have done the technique yourself.  
Score tape around the edges of my iPhone box, ready to apply my Eroded Metallic cut out template.
I prepared some copper tape with Distress Paints and a little Pitch Black alcohol ink and Blending Solution. for the corners and unfinished edges of the Eroded Metallic template.
I think I went slightly crazy using Distress Paints and alcohol ink together.  Love it on these metal surfaces (copper tape and the metal corners).  Very interesting colors and texture combinations.
Here I'm working with the layout of the embellishments for the top of the box.  I've used some vintage ephemera I bought from my sweet friend, Lisa Pace.  Love her beautiful art!!  The collection she sent me included these vintage doilies and this gorgeous miniature silver spoon from Italy.  I don't know how she could bear to part with it.  Its laid on my desk for the longest time, waiting to be included in a mixed media piece.  It was a joy to add it to this one, giving it meaning.

The little Heirloom Roses are so pretty.  Here's a video from CHA 2015 with Tim showing a lot of the new Ideology releases and a demo coloring these little resin roses.
So there it is.  All you need to know to enter and win CC3C challenges is here on Linda Ledbetter's blog.  Be sure to:

Speaking of our sponsor, this time its our good friends at Inspiration Emporium.  They've got a truly generous $50 gift certificate for a random winner!  Our Curiosity Crew choice wins a super special prize from Tim Holtz himself, and his Logistics Director, Mario Rossi.  

You've got two full weeks to create and enter and the Crew will be watching eagerly for all your creative entries!!


Saturday, May 9, 2015

Alcohol Ink Ombre

Who loves technique challenges?  I do! I do!
This is one of those that you are sure to be able to participate in because you are sure to already have what you need.  Do you have a bottle of alcohol ink?  Do you have a piece of felt and an applicator tool?  Some glossy card stock?  You're all set.
My niece's birthday was April 30 and I wanted a card that would be sassy enough for a 20 year old.  Thank you, Dina Wakley  LOVE her silouhette stamps and this one had the particular attitude I was going for.  I used the whole ombre piece for my background.  I added a bit of stenciling with Tim's Typography stencil.  I used some Indigo Alcohol Ink at first but it wasn't quite rich enough for me.  So I repositioned the stencil and stenciled the letters again with "Night", from Dina's Media paint.
I differed from Tim's technique in Compendium of Curiosities III by using different colors, but other than that the technique is the same.  I chose Willow, Meadow and Stream.
I gave my girlie some interesting wings using Stamper's Anonymous Classic #17 stamp set.  Love that mariposa collage.  I cut out the butterfly wings and colored them with Broken China and Mustard Seed Distress Inks, blending the color with a blending tool.
Tiny butterflies from the same stamp supply two points at the bottom right of my card.  

This challenge is sponsored by the lovely Linda Couglin at Funkie Junkie.  A random winner will receive a $25 dollar gift certificate to her website for a shopping spree!  Our Curiosity Crew choice will go to their mailbox and find a cache of Tim Holtz treasure, donated by Tim Holtz and Mario Rossi.    SO very cool!!  Find the few simple rules and guidelines on Linda Ledbetter's blog here.  Don't forget to leave some love on the Curiosity Crew blogs:

Cheryl Grigsby (that's me, do it below!!)

Grab you copy of Compendium of Curiosities and create!!


Saturday, April 25, 2015

Embossing Diffusers

Happy Spring, CC3Cer's!!  The weather is warming up and things are turning green and I'm thinking travel!  We've got a couple of family trips planned soon that we're really looking forward to and I took that theme for my challenge today.

I'm a big fan of dimension and texture and I love the look of embossed paper.  Embossing Diffusers are such a cool addition to this look!!  This year is all about frames for me, I see them everywhere and the "diffused" area creates a fantastic frame for your featured images.
I embossed a panel of watercolor paper using Tim's Regal Flourish Texture Fade embossing folder.  I picked up some Cracked Pistachio and Old Paper Distress Inks with a Detail Nib water brush and touched the high embossed areas.  I used Vintage Photo blended over the whole thing, leaving the center oval mostly white.

Note:
I used the following sandwich in my Vagabond, which would also work in the Big Shot:
Solo or Multipurpose Platform
Embossing Diffuser Plate
Embossing folder containing watercolor paper
Acrylic cutting plate

After running this sandwich through and getting my embossed area, I ran the paper back through with with following sandwich to get the inner oval frame to emboss:
Solo or Multipurpose Platform
2 Spellbinders Rubber Tan mats (you need to use rubber matting to equal the thickness of the acrylic cutting plate)
Watercolor paper with oval cutout placed over diffused oval area
Acrylic cutting plate

This is a bit different than what you'll read in Compendium of Curiosities III, but its what worked for me.  The point of this challenge is to use the Embossing Diffusers in your project, but you will need your own copy of the book, as always.  Hopefully, this will not confuse you, but will simplify things.  Tim's book, which I'm SURE you own!!, will add step by step photos and details to help you get your very best, successful result. 
 
We live in Colorado and Tim's Tall Trees stamp is a very worn, well loved stamp in my collection.  I traced the oval from the Embossing Diffuser on some paper and cut the oval out to create a mask, then stamped the Tall Trees through the mask.   I can really relate to the little jalopy bumping over mountain roads through the trees as we begin our journey. 
A little spiral of white wire tells you our jalopy is chugging along.  I've got a big bag of old car keys I got from an estate sale.  This one went with a 1969 white Ford of some kind.  4 door.  ;-)
 Some bits of Tim's Expedition Ephemera.  Planes, trains, and automobiles, baby.
When I was a little girl, wanted to go see all the places I saw on my View Master. Sequoia trees in California, Niagara Falls, Mt. Rushmore, all of it.  This Picture Wheel has always meant travel to me.  I put some alcohol ink on acetate and then cut an extra picture wheel, just for the little window cutouts.

How are you going to diffuse?  There are more ways to use this one and I KNOW you guys are going to find them!!!

Our sponsor this challenge is Inspiration Emporium.  A FABulous $50 gift certificate for a randomly chosen winner.  Just by entering your art!!  You oughta do it.  Just follow some simple guidelines on Linda Ledbetter's blog and you've got a chance for this cool prize.  The Curiosity Crew Choice wins an outrageous bundle of goodies from Tim Holtz himself!!  

Alrighty, then.  Go explore your world! 

Saturday, April 11, 2015

Smudge Stamping

Greetings, CC3Cer's!!  Thanks to all of you for all the beauty and inspiration you are creating.  I can't tell you how many times I look at your art and think to myself "I want to redo mine!"  Truly, you guys are all so awesome.  Your blogs are a joy to read and your art is a joy to view.  What a cool challenge to get to be a part of.  I am blessed.  YOU are blessing me!

This challenge is just super easy and I promise you, if you are a Timaholic at ALL, you have everything you need for this technique.  You can take off on this one a thousand different ways.  Let your creativity FLY.  I love the ebb and flow of these challenges.  Sometimes, there are very specific things you need to do creatively and sometimes the choices are wide open.  Find the technique on page 42 of your very own copy of Compendium of Curiosities III and GO!!

This time our challenge is sponsored by the good folks at Funkie Junkie, where Linda keeps Holtzie stuff stocked deep and wide.  Pay her a visit and do some shopping, she'll take good care of you!!  Our random winner gets an awesome $25 gift certificate from Funkie Junkie!!

Our Curiosity Crew choice will, after they stop jumping up and down and screaming, will win a bundle of fabulosity from Professor Holtz and his able teaching assistant, Mario Rossi.  Trouble is, they may not stop screaming for a while.  Its kind of an exciting thing.
Of course, I cannot explain the technique upon pain of death, but so I've just included some close ups of the details of my tag.  My "thing" that I wanted to build my project around was the stamp from Wendy Vecchi, "rules to live by".  So simple, I think I'm gonna get a tattoo.  My frame kind of covered up the stars on the sides of the first line of the text, so I stamped them again, cut them out and popped them out.  The text of this stamp, including the stars, are embossed with Wendy's Watering Can embossing powder.
***RED ALERT***
Ranger just announced today NEW colors from Wendy in Archival Ink Pads and Embossing Powders.  Pink Peony, Tiger Lily, and Violet.  That Wendy is a flower girl.  ;-)
 I stamped Wendy's bee on her Art Parts.  Such a cool dimensional statement.  I've big plans for Art Parts this summer, I'll be blogging what I'm doing with them!!  My tag layer is out of my "starter" basket, which is full of tags and bits that are just things with a bit of ink or embossing paste, or whatever, that I like for whatever reason and don't want to throw away.  I love that basket.
 Here's where I'm committing blogging blasphemy, I think.  I'm not sure I remember how I created this frame.  I picked up a frame I'd done several months ago and I'm not sure how I did it.  BUT!!  I'm pretty sure I cut the frame from Tim's Ornate Frame  Sizzix Bigz Die, painted over it with black gesso and then applied Picket Fence Distress Stain.  If I didn't, that's darn sure what I'm going to do the next time I need one of these suckers.
Ain't it, though?

For this project I used Wendy's Art-fully Said and Art for You stamp sets, Tim's Special Delivery Remnant Rubs and Typo Layering Stencil, Vintage Photo, Wild Honey and Walnut Stain Distress Inks, Wendy's Watering Can Embossing Powder, and Tim's NEW Handwritten Journey Thinlits dies by Sizzix.  I've been dying to use those dies!

Please visit all the Curiosity Crew blogs and leave them a little love, I know they love YOU!

Thanks for enjoying the journey with us.  I am, aren't you??