Birds & Words

Friday, November 6, 2015

Yvonne Blair Designs

Hey everybody!  I know you've arrived all inspired from your visit to Cheryl Boglioli's blog!!

I've taken a nice long break from blogging and am SO glad to break my blogfast with a celebration of Yvonne Blair Designs Impression Obsession stamps, Inky Art Journals, and Journal Buddy stenciling tool.  Everyone who has ever met Yvonne has fallen in love with her.  Her signature products reflect her warmth, her heart, and her inspiring and optimistic outlook on life.

My post today is a tribute to Yvonne.  Her love for butterflies, for the number 3, for vintage style and all things pink.  I love you, dear friend.


I began my Inky Art Journal page by blending Fossilized Amber Distress ink over the entire two page spread.  This is by far my favorite journal to use for art.  The manila pages are nice and thick and can handle gesso, inks and paints.  They open out nice and flat, which I have seen in any other journal.  They come in 6" x 8", 4" x 8", and 4" x 6" sizes.

I used Yvonne's Journal Buddy stenciling tool to create the wavy rainbow.  Twisted Citron, Cracked Pistachio, Wilted Violet and Abandoned Coral.  Some black stenciling and Picket Fence Distress Stain pigment drips help make the colors pop.


One of my very favorite Yvonne Blair Designs stamps.  She certainly listens to the whispers of her own heart and is inspiring us to do the same.  The little star is cut out from another of Yvonne's stamps.  The sentiment is stamped on stenciled bit of paper, colored with blended Victorian Velvet Distress Ink (a shade of Yvonne's favorite color, pink!), and die cut from Styled Labels.  Vintage cheesecloth and doilies peak from behind the label.


Yvonne often used butterflies in her art and this one (cut from Tim Holtz Layered Butterfly die and stenciled with "Art Is" text stencil from Crafter's Workshop and white embossing paste) is a tribute to her free spirit.  She also frequently includes doilies in her pieces and collects items with the number "3".


I cut two butterflies and layered one on top of the other and placed some foam squares near the body of the butterfly to separate the layers just a little.  I placed the wavy edge of the stencil at the side of the page with a glass cutting mat behind it.  I used a fine tip stylus and followed the wavy line over and over until the line was impressed enough to tear and leave a textured edge.


Straight lines are also from the Journal Buddy with can be used to create lines for journaling or just for interest.  I've used them vertically here.  I LOvE stamps and stencils with lines.  My handwriting tends to lay down and go to sleep on me, so I love to add lines to help keep it straight.  These lines are spaced far enough apart that you can double up and add more lines, or use them as is.


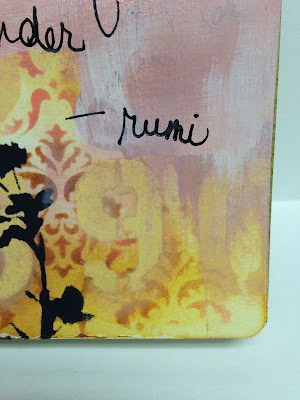
Wildflower stencil from Tim Holtz with white embossing paste and some Fossilized Amber ink blended over.  More butterflies, rub ons from Tim.


Do you LOVE the Journal Buddy Stencil??
You can buy Yvonne's Journal Buddy by emailing her here.

Do you LOVE Yvonne's signature stamps?
You can get your own here.

Do you LOVE Inky Art Journals?
Of course you do. Get yours by emailing her here.  Warning:  Buy several.  You'll be spoiled for any other.

Giveaway alert!!  Leave a comment on all the blog hop stops and get a chance to WIN a Journal Buddy stencil AND a 4 x 8 Inky Art Journal.  This is a new size and its like working on #10 tags.  Yvonne will randomly draw the name of our lucky winner!! 


Now hop on over to visit Linda Ledbetter's blog and feast on some brilliant creativity!!


Saturday, August 1, 2015

Layering Stencils: Monoprint

Jeepers, is it really the last CC3C?  I miss it already.  What a blast it has been working through Compendium of Curiosities, Volume III with all of you!!  I have been so inspired, so challenged, so thrilled to work through Tim's products and techniques and SO grateful that we all got to do it together.  

It would be so great to get to craft with you in person!!  I, along with some of my crafting besties, will be teaching in Costa Rica in October, 2016.  You can get all the information here about Craftours and Jim West's amazing opportunity to be inspired by the sensational sights, sounds, and scents of beautiful San Jose, Costa Rica.  I would LOVE to meet you there!

~~~~~

On to our challenge....


I have to say, our last challenge features one of my very favorite techniques.
Very simple, very grunge-erific.


A tip: often my very favorite is the second impression I do with this technique.  I lift and reveal the monoprint image and gasp a little.  Really, I do!!  So, get a nice thick stack of tags and play with this one.  I finished my project for my post yesterday, but I was still playing with it today.  Cards, tags, art journals, lots of places to use this one.


I just think this girl's got a secret, don't you?  I had prepared her for a prior challenge but didn't use her.  She refused to be ignored.  This is a technique of Tim's.  A layer of Glossy Accents between the Ideology Facet and the image, which was taken from Photo Booth vintage photos.


A spoon that my huz hammered for me.  I've got dozens and I love them.  I stamped the sentiment with one my very favorites, a Hero Arts alphabet set.  Confession:  I have a set I use and two extra new sets to use when I wear this one out.  I cannot be without these stamps.
To say the things I want to say.

This sentiment was my defining inspiration for today's challenge.  My dear, dear Curiosity Crew sisters and all of YOU inspire and encourage me more than I can say.  How lucky we all are to create art together!!


An old toothbrush (having been run through the dishwasher!!) sprayed liberally with Picket Fence Distress Spray Stain and flickered over my tag.  Don't you love splatters?


Bits of Tim Holtz Emporium Ephemera.  You get a TON of die cut pieces that work for so many different project themes.  I trimmed the bouquet die cut back closer to the image. A letter, a sprig of flowers, a movie ticket.  Memories.

~~~~~

Many, many thanks to our generous, art-hearted sponsors for these challenges.  They have been amazing.  I truly hope you'll keep them at the top of your shopping list for all your art supply needs.  Inspiration Emporium has been amazing and amazingly supportive.  Our sponsor for this challenge is Funkie Junkie Boutique with a $25 gift certificate for a randomly chosen winner.

And, of course, so many thanks to Tim Holtz and to Mario Rossi for their support and friendship.  When you lose your mojo or doubt your artistic ability, please remember and know that Tim would encourage you to Explore Your Curiosity and Enjoy the Journey.  Tim and Mario donated a huge cache at the very beginning of our challenges to be rewarded to the Curiosity Crew winners.  The winner of this challenge will take the last of that incredibly generous, unsolicited donation.  Thanks, guys.  You're amazing.

~~~~~

We've completed the book and our challenges are done.  But we're still curious.  We're not finished creating, are you?
Stay tuned.......


Friday, July 24, 2015

Vintage Journey - Guest Creative Guide


Hey everyone, check out Vintage Journey where I am Guest Creative Guide this month.  Vintage Journey has such a great collection of art by a pretty amazing lineup of creative talent, I am honored to join them!  The theme for July is "Destinations".  Vintage Journey features vintage/shabby chic/Tim Holtz inspired art.  Are you excited yet??

My project is a traveler's bag to collect and keep ephemera from my journey.  "Destinations" is a word pregnant with meaning and sparked many thoughts.  My approach was "Destination: Home" and an exploration of what that meant.  Hop on over to the Vintage Journey blog to see my traveler's bag along with the techniques and processes I used to create it.  Enjoy!!

Saturday, July 18, 2015

Altered Surfaces - CC3C #33

Hey, CC3Cers!  How's your summer?  Hope you're getting lots of time to create and experiment with your inks, powders, and paints and to study your copy Compendium of Curiosities, Volume III!!  Just two more challenges counting this one and we will have completed our course of curiosity.  Our last two challenges are techniques (YAY!!)  

This week's challenge is sponsored by Inspiration Emporium with a fantastic $50 gift certificate.  Nice shopping spree there!  The Curiosity Crew choice gets a nice little bundle of swag donated by Tim Holtz and Mario Rossi.  Wouldn't that make your day??

All the rules & regs are found here on Linda Ledbetter's blog.  Be sure and leave a little buzz on the Curiosity Crew blogs to keep your eligibility alive.  This crew is so varied and talented, you're sure to find some inspiration to get you going!

~~~~~~~~~~~~~~~~~~~~~~~~~~~~~~~~~~~~~~

Now on to this week's project....
I decided to make a tag this time.  I began with a #8 manila tag.  I did the technique, found on page 45 of Tim's book, on a few different pieces.  You are going to have a high rate of success achieving this one. Its really easy and Tim's instructions are great.  Pay attention, though, when he says to let your embellishment piece cool a bit during the process!  I do recommend multiple colors, it really adds grungy goodness.
This piece got a little hot.  Its supposed to be a grungy piece, so its not ruined.  I'll use it somewhere else.  I LUV ampersands.
The technique requires a nonporous surface, so I thought I'd experiment with sealing a piece with metallic paint and making it nonporous.  Its a different look, but I really did like it.  I included it on this piece so you'd see the technique on a couple of different kinds of surfaces.  This is from Wendy Vecchi's Mat Minis Flower Pots.
I cut a lot of tiny snips slanted right and then left along the cone of the coneflower.  It created an irregular edge that made the flower look a bit more natural.  I inked the edges with Vintage Photo and then Hickory Smoke.  I'm tellin' ya, Hickory Smoke is going to be a new favorite for inking and distressing edges.  The background is made with embossing paste tinted with Aged Mahogany and one drop of Vintage Photo reinker.  I sprayed the tag with Hickory Smoke Distress Stain Spray.  The flowers are colored with Vintage Photo, Fossilized Amber, and Twisted Citron Distress Markers.
I selected a Small Talk sticker phrase.  I snipped it and applied to a scrap of black card stock and then traced the edges with a Twisted Citron Marker to tie in color.  I trimmed around the word blocks and popped them out.
I've got a feeling you guys are going to rock this one.  Can't wait to see what surfaces you dig out of your stash!!

Saturday, July 4, 2015

Frosted Film CC3C #32

Hello summa!!  I can take a hot week over a cold day anytime and I LOVE summer.  I was born for shorts and flip flops.

We had a certain teacher come to the shop and teach a few years ago who was wearing some really cute shoes she had decorated.  I can't tell you her name (it starts with Wendy and ends with Vecchi), but she's sort of a sandal enthusiast.  Okay, she's a full blown sandal freak but this was a great idea.  Based on her inspiration, I started doing make and takes in the summer at the store for tourists to trick out their flip flops and, of course, tricked out my own.

This summer mine were kind of sad.  I had done them forever ago and they needed an update. I thought this challenge was a good time to do that AND do a tutorial on how to interchange your FFF (flip flop flair).


Our challenge this week uses Tim's self adhesive Frosted Film.  You can pick some up at your local craft shop or order it from our sponsors, Funkie Junkie Boutique or Inspiration Emporium.  It comes in a roll like waxed paper and you get a ton of it, 12 x 72 inches.  You can apply it to a variety of surfaces to give a soft, translucent frosted effect.  The technique Tim teaches is on page 59 of Compendium of Curiosities.  You'll need your own copy for our challenges and for your own general creative health and well being!


I've employed Tim's technique using Frosted Film and die cut butterflies from his new Butterfly Duo die and embossing folder set.  As you can see in the photo, I tested my coloring on the die cut scraps, which I recommend that you do.  I differed a little in the way I applied color from Tim's book in that I  put a few drops of Archival reinker on a felt applicator and inked my die cut pieces.


A little text over my butterflies with my favorite script stamp.


I shaped the butterflies with a heat tool.


I heat shaped a white butterfly layer and stapled the two together with my mighty Tiny Attacher.  LUUUV that thing.  I used my dark brown waxed linen to wrap and form a butterfly body and to partially hide the staple.


I hand stitched some strips of Tim's Eclectic Elements fabric on the edge, pulled the thread and made yoyo's for a backing for my little butterflies.  


I wanted to create some antennae but the waxed linen was too thin.  So I braided some strands, tied some knots and then cut between the knots.


I glued the antennae and the die cut greenery sprigs to the yo-yos with fabric glue.  Now time for the tie assembly.....

I like to make these so that I can tie and untie them on my flip flops.  So here's my system:
Thread a tapestry needle with waxed linen or a narrow ribbon.  Tie a knot at the end and another knot about 6-8 inches higher.


Pull the needle from back to front of the yoyo.  Your higher knot will catch and leave a 6-8 inch tail.  Stitch the butterflies to the yo-yos, with the last stitch coming out the back.  Knot the thread to secure and then cut the thread to leave another 6-8 inch tail.  You can trim and shorten these later if they're too long.

I needed to do it this way for my butterflies.  If you use flowers, you can just thread your tie through a button flower center, leaving the tails hanging from the back.

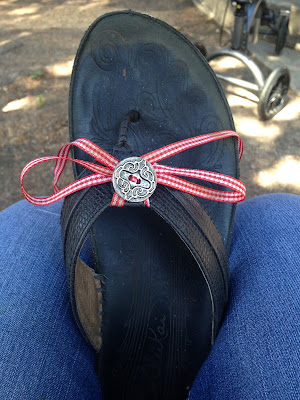
I used a button and red ribbon so it would be a little easier to see to a demo.
Here's how you tie the FFF to your flips:


This is challenge number 32.  We're gonna have to start using Roman numerals, this thing is getting so epic!!  If you aren't aware or are new to our challenges ("welcome!!!" in high falsetto), please check out the beautiful Linda Ledbetter's website for poetically worded guidelines and advice that will make you eligible to win inspiring prizes!  Funkie Junkie Boutique has donated a generous $25 gift certificate to a lucky random winner.  Tim Holtz and Mario Rossi have donated a incredibly cool cache of giveaways to the Curiosity Crew choice.  Be sure to leave a note on each Curiosity Crew blog to be eligible to win either prize!!

Three more chances to win!

----------------------

Thank you so much to all of you who expressed thoughts and good wishes for my husband.  He's on the mend and doing great.  I so appreciate your kind words and care.

Saturday, June 20, 2015

Layering Stencil: Paint Resist


Challenge #31.  Thirty one.  Three.  One.  That is a LOT of art!!

Great technique challenge this time that lends itself to all kinds of mixed media applications.  I thought I was going to do a card then thought I'd do a tag.  I ended up doing an art journal page using my tag.

Page 47 of Compendium of Curiosities III is where you'll find simple instructions for this technique.  Inspiration Emporium is our sponsor this challenge with an incredibly generous $50 gift certificate.  The Curiosity Crew choice wins an awesome cache of crafting gear from Sir Tim Holtz and his able assistant, Mario Rossi.  Check out all the guidelines you'll want to know about to be eligible for to win on Linda Ledbetter's blog.  Be SURE to leave some love on my Curiosity sisters blogs!!  

I used Scattered Straw and Bundled Sage Distress Paints with Typo, Wildflower, Numbering, and Gothic Layering Stencils.  Victorian Velvet and Wild Honey are my Distress Ink choices.  And Vintage Photo.  Always Vintage Photo.


I was surprised and happy to find the Distress Paint resisted drips of Distress Spray Stain!!  I keep adding more and more touches of black, it looked great against the lighter, earthy colors.


I wrote my quote on an earlier version of right page and just blew it.  The stenciling made the background too busy and the writing got lost.  


This is the best, most funnest thing about art journaling to me.  You can gesso and paint over anything.  The mistakes often make the thing that you love the most, in the end.  I found this quote which I really loved.  I've been thinking about it for a while and really appreciated this chance to use of for an art journal page.  Dina Wakley's Fude Ball pens from Ranger are so great for art journaling, they write on anything!!  Very smooth and fluid.

I hope you have FUN with this tech!!  Go get painty!!

---------------

Soooooo......  how was your week?

Mine was a little crazy.  Actually the last two weeks.  On June 8 my husband went out for a sort hike in Rocky Mountain National Park, which is about 15 minutes from our house.  I got a call from him that afternoon that he had broken his ankle and needed help.  The short story is the Park Ranger Search and Rescue team (heroes!!!!) searched for him for six hours.  Once they found him, it took them over eight hours to get him back to the trailhead where I was waiting at 2 am to take him directly to the hospital.  Surgery that afternoon and then home by 7 pm.

It is still so surreal!!  If you're interested, you can read about it here.


I didn't really get to comment on your art for the last challenge and for that I apologize.  BUT my huz is doing really, really well and will be back on the trails this year, I'm sure.  I'm getting my schedule back and I'm really looking forward to more studio time!!

Saturday, June 6, 2015

Faux Cracked Glass

Greeting, artists!!  I have to say to all of you today that I am so enormously thankful and happy to be on this journey with you.  This is Challenge #30 (what????) and each one is more fulfilling than the last.  I can't believe I get to take this ride with all of you.

I want you to know I respect you so much, that I thoroughly enjoy reading your blogs and viewing your art.

I want you to know that ALL of you are:
Our challenge today is found on page 54 of Compendium of Curiosities Volume III.  What an amazing resource this book is!!  If you don't have your own copy, you'll need that to be eligible to win either:

the bounty of prizes, donated by Tim Holtz, for our Curiosity Crew winner
OR
a generous $25 gift certificate, sponsored by Funkie Junkie Boutique, for our randomly chosen winner.

Our Honorable Mention winners tell us it makes their day, too, to have their art recognized!
I used one of Tim's Corked Glass Vials for my featured Faux Cracked Glass piece.  The technique worked beautifully here.  I tapped (not rubbed, so as not to flake away the cracked pieces) the cracked medium with my blending tool loaded with Vintage Photo Distress Ink.  Then I gave it a light spritz of water to move the color into the cracked areas.  I blotted it with a cotton cloth to remove some of the color from the outside of the vial.
I used the burlap from Tim's Textured Surfaces to cover a tag.  I bound my cracked glass vial to the tag with waxed linen and put a few sprigs of dried yarrow from our yard into it.  There are a few paper sprigs from Tim's Spring Greenery Decorative Strip Die from Sizzix and cut from Retro Grunge Paper Stash Pad, as a little extra filler.
My stamp is a brand new one, Bird Trio, from B Line Designs.  Their new release, Vintage Spring, has some gorgeous images!  I cut this image up a bit and added a sprig of flowers at the bottom right corner.  I also stamped and cut out the middle and right birds to layer and pop them up.

I used the Faux Cracked Glass technique on a Fragments square.  I colored this one with Teakwood alcohol ink.  A bit darker but it made a nice layering piece.
I LOVE these Flip Frames.  LOVE, seriously.  I rubbed Weathered Wood Distress Paint on this one with my fingers and then buffed it a little with a cotton cloth before it was dry.  Effortless, truly.  I love the shabby chic effect.  But you don't have to paint them at all, they are gorgeous as is.
I measured my hanging piece at 3 1/4 x 5 1/4.  It would have been SO smart to hang it in the frame before I did all my work on it, which I didn't!!  If I had, I would have trimmed it just a bit more at the bottom.  But it works just the same.

Grab your CC3 and go for it!  Check out Linda Ledbetter's blog for all you need to know about how to join in and don't forget to leave some love for the Curiosity Crew who, no doubt, are even now feverishly creating!


Happy creating and we'll be watching!!