Birds & Words

Tuesday, December 11, 2018

Simple, Special Creative Impressions Christmas


This year I needed a SIMPLE yet special card to send to family & friends for Christmas.  Easy to achieve with Creative Impressions ribbons & brads!

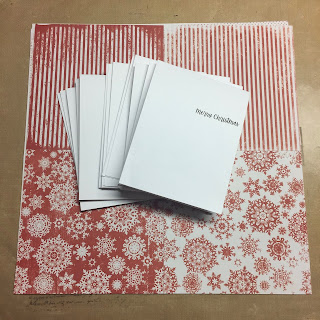
I positioned the words "Merry Christmas" on a page on the word processing program on my computer.  I created two columns and the words are about 3 1/4 inches from the bottom of the page.  Print onto simple white card stock and cut in half lengthwise.  Fold and you're to complete the cards.


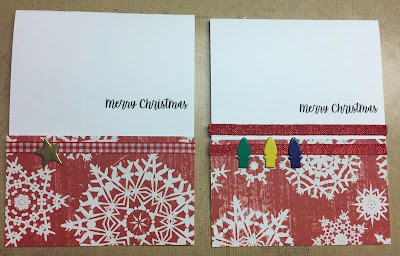
Cut 4 1/4 x 2 1/2 inch panels of decorative Christmas paper.  Cut a length of coordinating ribbon and attach to top of Christmas paper.  Affix Christmas brad and adhere panel to the card stock base.


Lots of variations on the design using different ribbons and brads.


Every morning, I complete 6 or 8 cards for mailing.  Super easy and not too time consuming, which was GREAT.  Just what I needed this busy Christmas season!


Even when you've got a lot going on, 
you can come up with simple cards to remember all the loved ones on your list!


Tuesday, October 16, 2018

Fall Birthday - Crazy!!


Love my fall and winter birthday cards!  So fun to customize these birthday greeting for the season.  I've got a TON of October & November birthdays to remember.

Creative Impressions fall leaf brads are great to bring in that feeling of leaves randomly floating to the ground.  I even dressed up the hat with a leaf instead of a flower. 

These funky Tim Holtz stamps are so fun for a whimsical greeting.  I've got a good friend who has had some surgery that will require a tough recovery.  She's not one for sappy sentiments and needs something to make her laugh.  This sentiment from Yvonne Blair over at Impression Obsession  is just perfect for this goofy bird. 

Tuesday, September 25, 2018

Welcome to Autumn Splendor - Creative Impressions!


This is a glorious time of year here in Colorado.  I wake up to the sound of elk bugling and go to bed at night hearing the same calls.  Its enough to inspire one to create!


We have some guests arriving today and I wanted to make a quick little welcome tag for them.  I made a couple and wanted to show you both.

I cut off the bottom 1 3/4" of a #8 size tag so my elements would all fit on nicely.  I used an Art Impressions elk stamp, aspen leaves from B Line Designs and a Hero Arts alphabet set and Creative Impressions ribbons & brads.  I colored the aspen leaves with Fossilized Amber and Ripe Persimmon Distress inks.  I love the how the touches of Ripe Persimmon give the beautiful apricot color so prized in our fall color.

Tuesday, September 18, 2018

How to Trick Out Your Bell Bottoms


I'm playing with Creative Impressions Embroidery Template again today.  I have some favorite, comfortable old bell bottom jeans and was in a 70s kind of mood.  I stitched my jeans back in the day but I don't think I ever added metal embellishments!  I used the Fan Stitch and added Creative Impressions antique copper photo holders and brads for a little fun metal fringe.  

I think I'm going to add this to the back pockets, too!


Wednesday, August 29, 2018

Happy Day to You!


Happy Day!  This little guy makes a super cute, whimsical birthday card for men of all ages.  Its loaded with Creative Impressions embellishments and features a new Embroidery Stitch Template!  More about that below.


I wanted to create a frame with folded margins on a panel of cotton broadcloth.  I folded all four sides and ironed them down.  I was going to make french knots in the corners with Creative Impressions organdy 1/8" ribbon, but.....


I ended up liking the knots on the other side better.  Here you can see the pencil marks created with the Embroidery Stitch Template.


The template sheets are made to be cut apart, which I obviously haven't done yet.  I lined up and marked the template on all four sides.  I came up with a stitch pattern and went to work.


Here is the detail of my stitches using embroidery thread.  I added CI micro brads at selected points and stacked CI buttons tied with CI twine.  


This are the brand new Embroidery Stitch Templates.  Very cleverly designed, you can use these on paper or fabric.  You can see all the templates and the great variety of stitches you can make below.  To order, contact Creative Impressions in Colorado Springs at 719-596-4860.  They'll take good care of you!


Thursday, July 26, 2018

Tag Art Love!!


Tag Art Love today with a tag from my starter basket.  I had previously splotched Distress Oxide Inks onto a tag and a die cut butterfly.  I was playing with making stems with twisted twine from Creative Impressions for flowers stems.  They make a pretty subtle texture on card panels, layered over burlap, layered over an inky tag.


Punch a couple of holes with an awl onto your panel.  Thread twine through the panel and tape the tail in the back.  Twist the twine, thread back through and tape the remaining tail in the back.


Organization tip:  I keep lengths of twine, waxed linen, and other fibers for sewing onto cards and paper arts projects in a small clear glass jar.  I punch a couple of holes in the lid and keep a couple of needles, threaded or ready to thread for sewing.


Wednesday, July 11, 2018

Simple "Thank You" Surprise

I have two gears.  Either way-to-much, over-the-top, this-is-going-to-cost-a-fortune-to-mail or super simple.  Today is super simple.


Elegant, black & white card front with a die cut "thank you".  Tip:  I used low tack washi tape to line up my words and then pulled it up after I glued down the die cuts.


Black and white carries through inside with an added pop of gold embossing powder.  I used my Perfect Medium pen and wrote out my message and then embossed that with gold embossing powder.  A little gold Creative Impressions heart give the message a little punch.


I used Ranger clear Embossing Dabber and smeared around the border of the white textured panel and embossed that with gold EP.  I used a distressing tool and scratched the edges of a white layer, applied Embossing Dabber to the scratched edge and then drug that edge through gold EP for a fine detail layer.


The inside panel is a pop up.  

Cards usually have a decorated front and a simple message and signature inside.  I wanted to reverse that on this card and make the inside an embellished surprise!


Tuesday, July 3, 2018

Best Creative Wishes from Creative Impressions!


This week I've got a fun 6x6 card for you, layered up with lots of butterflies and a bit of crinoline.


I made a trip down to Colorado to see Janet at Creative Impressions.


I love getting together with creative friends to discuss designs and make plans!


One of the sweetest ladies in the world.  So easy to love.


Creative Impressions is HUGE!  A great collection of ribbons and embellishments.  It always reminds me of that final scene in Raiders of the Lost Ark.  You may remember the scene when they assure Indy that they are taking care the Ark of the Covenant.  "Our top men are on it."  Then you see it be wheeled into a warehouse in a box labeled "Top Secret Government Intel: Do Not Open".


There's no telling what she's got in there!!  Ha!


Tuesday, June 5, 2018

Creative Impressions - Touches of Color


Another simple card today.  My schedule is really busy lately and I'm LOVING simple.  You?

This was a fun color play.  Very little color in the card, but a nice exercise in tying in touches of color for balance. 

The Creative Impressions brads and flower brad gave me three touches of yellow.  The layered panel, Creative Impressions flower center and message ribbon gave three touches of purple.  The bird cage, birds and words "happy birthday" gave three touches of black.  I used a twill ribbon layer behind the purple ribbon and balanced that with a kraft card stock card base.  I also did a double matted the card with a white layer which really made the 3D embossed background layer pop.

These will be birthday cards for my little girl cousins.   Creative Impressions always saves the day for me when doing kids birthday cards because I don't have many "kid" stamps or elements.

Thanks for checking out my blog and find some touches of color in your day today!

Wednesday, May 30, 2018

Ric Rac Love!

Having SO much fun playing with Creative Impressions jumbo ric rac.
Here's a couple of simple cards with lots of texture.

I stitched a bunch of lengths of Creative Impressions ric rac and then sat and just came up with several different cards.  This one frames a Tim Holtz rub on message with Creative Impressions antique copper frame & brads.  LOVE these little frames.


Here I added a rub on message to Creative Impressions white jumbo brad for a flower center.
Cute message for a birthday card?


Here's a close up of the little embroidered flowers.  Super simple but a fun way to add interest.

T

Tuesday, May 8, 2018

Happy Graduation from Creative Impressions!

Its time to have a few graduation cards on hand.   These can be used for other occasions, so I like to make a couple extra. 

Creative Impressions mini star brads give this card some flair!


I love stars!  They are really versatile and can be used for lots of different occasions and themes.  Its easy to find quotes and song lyrics to use as your sentiment. 

This song lyric is probably better suited to someone who graduated 40 years ago (who, me??), but I still like it.  Its a song by Bad Company and I like to use it for graduates.


The card front is watercolor paper.  I'm reaching for that a lot these days because I love the thickness and texture.  I blotted some Antique Linen and Fossilized Amber Distress Oxide inks onto the watercolor paper.  I then added white embossing paste through a flourish stencil.  I cut a star from glitter paper for my shooting star and then added lots of Creative Impressions mini star brads for a trail of little stars.  I used some sunflower Perfect Pearls powder which I applied with a dry paint brush to the stenciled embossing paste.  Spritz with water to adhere.

Pretty simple card but the graduates are looking for what's inside, right?

Tuesday, May 1, 2018

Creative Impressions - Mother's Day Rickrack Roses

Are you thinking about Mother's Day?  You better start, May 13 is right around the corner!  I've been wanting to try my hand at these lovely rickrack roses and Mother's Day is just the time for something special.


This is not my technique, I discovered it on Pinterest.  You can see the tutorial from the very talented Jessi on her blog, Practically Functional.

I used a "thank you" die.  I was inspired this week to just say to mom:

Remember how you always took care of me?  How you loved and encouraged me?  How you tended me every time I was sick?  Remember how you gave me the best and took what was left for yourself?
Thanks, mom.  I love you.


I used 1/2" pink rickrack from Creative Impressions to make these pretty roses.  Green rickrack make the leaves and natural provided a nice border. 


This was a really fun card to put together.  Its got lots of layers and textures to give it interest. All elements including ribbons and black matte frames and brads are from 
Creative Impressions.

Whether your mom was perfect or flawed or a mixture (aren't most of us a mixture?), making her Mother's Day card provides a chance to just think about her and remember.  And say thank you.