Hello summa!! I can take a hot week over a cold day anytime and I LOVE summer. I was born for shorts and flip flops.
We had a certain teacher come to the shop and teach a few years ago who was wearing some really cute shoes she had decorated. I can't tell you her name (it starts with Wendy and ends with
Vecchi), but she's sort of a sandal enthusiast. Okay, she's a full blown sandal freak but this was a great idea. Based on her inspiration, I started doing make and takes in the summer at the store for tourists to trick out their flip flops and, of course, tricked out my own.
This summer mine were kind of sad. I had done them forever ago and they needed an update. I thought this challenge was a good time to do that AND do a tutorial on how to interchange your FFF (flip flop flair).
Our challenge this week uses Tim's self adhesive Frosted Film. You can pick some up at your local craft shop or order it from our sponsors,
Funkie Junkie Boutique or
Inspiration Emporium. It comes in a roll like waxed paper and you get a ton of it, 12 x 72 inches. You can apply it to a variety of surfaces to give a soft, translucent frosted effect. The technique Tim teaches is on page 59 of
Compendium of Curiosities. You'll need your own copy for our challenges and for your own general creative health and well being!
I've employed Tim's technique using Frosted Film and die cut butterflies from his new Butterfly Duo die and embossing folder set. As you can see in the photo, I tested my coloring on the die cut scraps, which I recommend that you do. I differed a little in the way I applied color from Tim's book in that I put a few drops of Archival reinker on a felt applicator and inked my die cut pieces.
A little text over my butterflies with my favorite script stamp.
I shaped the butterflies with a heat tool.
I heat shaped a white butterfly layer and stapled the two together with my mighty Tiny Attacher. LUUUV that thing. I used my dark brown waxed linen to wrap and form a butterfly body and to partially hide the staple.
I hand stitched some strips of Tim's Eclectic Elements fabric on the edge, pulled the thread and made yoyo's for a backing for my little butterflies.
I wanted to create some antennae but the waxed linen was too thin. So I braided some strands, tied some knots and then cut between the knots.
I glued the antennae and the die cut greenery sprigs to the yo-yos with fabric glue. Now time for the tie assembly.....
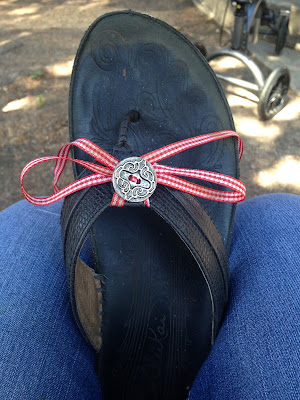
I like to make these so that I can tie and untie them on my flip flops. So here's my system:
Thread a tapestry needle with waxed linen or a narrow ribbon. Tie a knot at the end and another knot about 6-8 inches higher.
Pull the needle from back to front of the yoyo. Your higher knot will catch and leave a 6-8 inch tail. Stitch the butterflies to the yo-yos, with the last stitch coming out the back. Knot the thread to secure and then cut the thread to leave another 6-8 inch tail. You can trim and shorten these later if they're too long.
I needed to do it this way for my butterflies. If you use flowers, you can just thread your tie through a button flower center, leaving the tails hanging from the back.
I used a button and red ribbon so it would be a little easier to see to a demo.
Here's how you tie the FFF to your flips:
This is challenge number 32. We're gonna have to start using Roman numerals, this thing is getting so epic!! If you aren't aware or are new to our challenges ("welcome!!!"
in high falsetto), please check out the beautiful Linda Ledbetter's
website for poetically worded guidelines and advice that will make you eligible to win inspiring prizes!
Funkie Junkie Boutique has donated a generous $25 gift certificate to a lucky random winner.
Tim Holtz and Mario Rossi have donated a incredibly cool cache of giveaways to the
Curiosity Crew choice. Be sure to leave a note on each Curiosity Crew blog to be eligible to win either prize!!
Three more chances to win!
----------------------
Thank you so much to all of you who expressed thoughts and good wishes for my husband. He's on the mend and doing great. I so appreciate your kind words and care.


