Birds & Words

Thursday, February 14, 2019

Fourteen Hearts - Day 14


And we're done!  This card got a distinctive touch with a silver filigree butterfly.  I collect lost "single" earrings to use on my cards and have been saving this one for something special.  I think I know just where this one is going.  

Hope you've enjoyed this journey with me.  Happy Valentine's Day!

Wednesday, February 13, 2019

Fourteen Hearts - Day 13


Words aren't needed here, the little framed heart says it all.   The doily scrap got a makeover with a bit of cheesecloth, bits of muslin and a silver brad center.

Tuesday, February 12, 2019

Fourteen Hearts - Day 12


The die cut rose bouquet really grabs the eye and give the vintage vibe to this valentine.  The small message stamps used in this series are from Rubber Soul, very sweet little touches.

Monday, February 11, 2019

Fourteen Hearts - Day 11


Teal sequins frame this valentine. Its hard to see in the photograph but the frame contains a popped out square with the rub-on words "be true".  Lots of color play here.

Sunday, February 10, 2019

Fourteen Hearts - Day 10


I never get tired of birds!  This little guy in perched on a bit of vintage doily, nested in the wildflowers, reminding you that Jesus loves you.  <3 font="">

Saturday, February 9, 2019

Fourteen Hearts - Day 9


This daisy trim just begged for a heart flower center!  You see 3 points of red and the flower has a vintage button center, balancing the vintage trim, left and right.

Friday, February 8, 2019

Fourteen Hearts - Day 8


This 3 x 3 panel from Tim's Wallflower Paper Stash is one of my all time favorite images. 
I grabbed several odd pieces to build a shabby flower and added a touch of black with rub-ons.   

LOVE that punch of red on these muted colors.

Thursday, February 7, 2019

Fourteen Hearts - Day 7


This pretty blue flower has been in my stash for a while and I loved using it here!   I balanced the silver metal element at three points and included a bit of delicious cotton hand crocheted trim.

Wednesday, February 6, 2019

Fourteen Hearts - Day 6


One of my favorites!  These die cut chipboard words from Maya Road work great for valentine messaging.  Our little black bird shows up to perch on this sweet card.

Tuesday, February 5, 2019

Fourteen Hearts - Day 5


Background paper for all these valentines come from Tim Holtz Wallflower Paper Stash pad, introduced several years ago.  The second I laid eyes on these papers I fell in love and I've never fallen out of love.  Appropriate for valentines, no?

Monday, February 4, 2019

Fourteen Hearts - Day 4


Music notes are fun to pair with birds.  Elements on this valentine are from Creative Impressions, Tim Holtz and Ken Oliver.

And, of course, bits of vintage, hand crocheted doilies.

Sunday, February 3, 2019

Fourteen Hearts - Day 3


So glad to use these vintage doilies.  I love them so much, its hard for me to cut them up but once I begin I can't stop!

Add bits of cheesecloth for texture and a little black bird silhouette and valentine is complete.  


Saturday, February 2, 2019

Fourteen Hearts - Day 2


Today's valentine features a doily I've cut up.  The flashcards "always", "love", and "adore" are loose and tucked into the corner die cut element

See that little heart brad?  You'll see it again.  ;-)

Friday, February 1, 2019

Fourteen Hearts - Day 1


I was able to grab a couple of days in my studio of unstructured PLAY!
So much fun to not have a deadline or project that I need to get done.
I keep little containers of embellishment bits and pieces that I like but haven't used for whatever reason and I love to just spill those out and start playing.

I had the idea that I wanted to make valentines for all the ladies in my Bible study.  I was on a roll to make a dozen or so different cards and thought "why not just keep plugging and blog a valentine a day for 14 days?"  Works for me!

So here's day 1.  Enjoy!

Tuesday, December 11, 2018

Simple, Special Creative Impressions Christmas


This year I needed a SIMPLE yet special card to send to family & friends for Christmas.  Easy to achieve with Creative Impressions ribbons & brads!

I positioned the words "Merry Christmas" on a page on the word processing program on my computer.  I created two columns and the words are about 3 1/4 inches from the bottom of the page.  Print onto simple white card stock and cut in half lengthwise.  Fold and you're to complete the cards.


Cut 4 1/4 x 2 1/2 inch panels of decorative Christmas paper.  Cut a length of coordinating ribbon and attach to top of Christmas paper.  Affix Christmas brad and adhere panel to the card stock base.


Lots of variations on the design using different ribbons and brads.


Every morning, I complete 6 or 8 cards for mailing.  Super easy and not too time consuming, which was GREAT.  Just what I needed this busy Christmas season!


Even when you've got a lot going on, 
you can come up with simple cards to remember all the loved ones on your list!


Tuesday, October 16, 2018

Fall Birthday - Crazy!!


Love my fall and winter birthday cards!  So fun to customize these birthday greeting for the season.  I've got a TON of October & November birthdays to remember.

Creative Impressions fall leaf brads are great to bring in that feeling of leaves randomly floating to the ground.  I even dressed up the hat with a leaf instead of a flower. 

These funky Tim Holtz stamps are so fun for a whimsical greeting.  I've got a good friend who has had some surgery that will require a tough recovery.  She's not one for sappy sentiments and needs something to make her laugh.  This sentiment from Yvonne Blair over at Impression Obsession  is just perfect for this goofy bird. 

Tuesday, September 25, 2018

Welcome to Autumn Splendor - Creative Impressions!


This is a glorious time of year here in Colorado.  I wake up to the sound of elk bugling and go to bed at night hearing the same calls.  Its enough to inspire one to create!


We have some guests arriving today and I wanted to make a quick little welcome tag for them.  I made a couple and wanted to show you both.

I cut off the bottom 1 3/4" of a #8 size tag so my elements would all fit on nicely.  I used an Art Impressions elk stamp, aspen leaves from B Line Designs and a Hero Arts alphabet set and Creative Impressions ribbons & brads.  I colored the aspen leaves with Fossilized Amber and Ripe Persimmon Distress inks.  I love the how the touches of Ripe Persimmon give the beautiful apricot color so prized in our fall color.

Tuesday, September 18, 2018

How to Trick Out Your Bell Bottoms


I'm playing with Creative Impressions Embroidery Template again today.  I have some favorite, comfortable old bell bottom jeans and was in a 70s kind of mood.  I stitched my jeans back in the day but I don't think I ever added metal embellishments!  I used the Fan Stitch and added Creative Impressions antique copper photo holders and brads for a little fun metal fringe.  

I think I'm going to add this to the back pockets, too!


Wednesday, August 29, 2018

Happy Day to You!


Happy Day!  This little guy makes a super cute, whimsical birthday card for men of all ages.  Its loaded with Creative Impressions embellishments and features a new Embroidery Stitch Template!  More about that below.


I wanted to create a frame with folded margins on a panel of cotton broadcloth.  I folded all four sides and ironed them down.  I was going to make french knots in the corners with Creative Impressions organdy 1/8" ribbon, but.....


I ended up liking the knots on the other side better.  Here you can see the pencil marks created with the Embroidery Stitch Template.


The template sheets are made to be cut apart, which I obviously haven't done yet.  I lined up and marked the template on all four sides.  I came up with a stitch pattern and went to work.


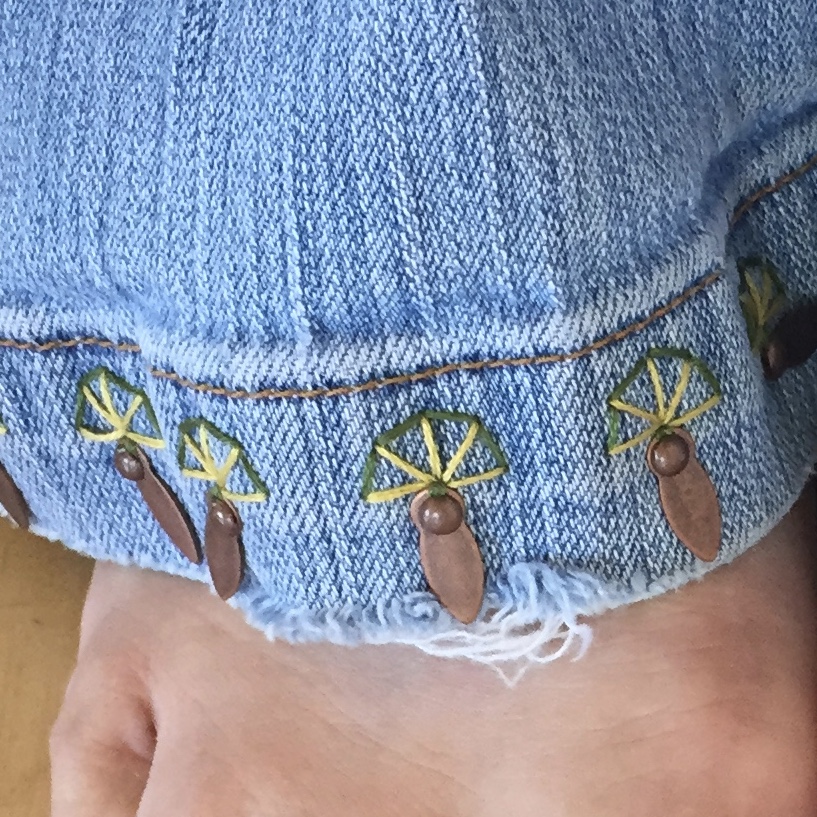
Here is the detail of my stitches using embroidery thread.  I added CI micro brads at selected points and stacked CI buttons tied with CI twine.  


This are the brand new Embroidery Stitch Templates.  Very cleverly designed, you can use these on paper or fabric.  You can see all the templates and the great variety of stitches you can make below.  To order, contact Creative Impressions in Colorado Springs at 719-596-4860.  They'll take good care of you!


Thursday, July 26, 2018

Tag Art Love!!


Tag Art Love today with a tag from my starter basket.  I had previously splotched Distress Oxide Inks onto a tag and a die cut butterfly.  I was playing with making stems with twisted twine from Creative Impressions for flowers stems.  They make a pretty subtle texture on card panels, layered over burlap, layered over an inky tag.


Punch a couple of holes with an awl onto your panel.  Thread twine through the panel and tape the tail in the back.  Twist the twine, thread back through and tape the remaining tail in the back.


Organization tip:  I keep lengths of twine, waxed linen, and other fibers for sewing onto cards and paper arts projects in a small clear glass jar.  I punch a couple of holes in the lid and keep a couple of needles, threaded or ready to thread for sewing.