Birds & Words

Tuesday, December 5, 2017

A Creative Impressions Christmas - Part II

Today I want to share just a few more ideas for a Creative Impressions Christmas!  I'm using more Creative Impressions die cut felt shapes.  A lot of us have die cut machines, but these shapes are so intricate that its awfully nice to just buy them precut.  This cute little deer from the Felt Shapes Christmas collection makes a sweet little Rudolph on your Christmas tags and packages.  Just add a sparkle to his nose and he's ready to leap into the air!

Here I used Faded Jeans Distress Oxide ink.  Creative Impressions embellishments include Star Bling, Bright Smooth Circle Bling, Merry Christmas Twill Expressions, and white Micro Rounds.  A scrap of crinoline frames the "Merry Christmas" message.


Use Creative Impressions to decorate your packages!  Our little Rudolph is adorable against layered 1/4" Red Glimmer Ribbon and 1" Red Blank Grosgrain Ribbon.  Lay out your ribbon layers and fasten them together with white Micro Rounds.  Wrap around your white gift wrapped package adhere in the back, then glue down Rudolph.


I used gold embossing paste on a tag through a Tim Holtz Gothic stencil, spritzed the stencil with water and applied this second generation of gold embossing paste on this tag.  An assortment of Felt Snowflakes and Felt Christmas Ornaments secured with Micro Rounds on this "Winter Wonderland" Creative Impressions tag.  A Natural Mini Clothes Pin clipped to the message complete it!

~~~~~~~~~~~~~

I hope you have fun decorating your packages this year. 
A very, very merry Creative Impressions Christmas to you all from Jan, Susan and Cheryl!


Thursday, November 30, 2017

Its a Creative Impressions Christmas!! - Part I

Confession time.  My favorite thing about Christmas?  Well, apart from time with family its got to be wrapping gifts.  I LOVE wrapping gifts.  I think the gifts under the tree are a part of my Christmas decorations and I want them to be beautiful.  I love pretty packages so much that what's inside is usually a disappointment because I wrap the simplest, insignificant gifts in an elaborate, expensive looking way.  Oops.  

Creative Impressions has some super cute die cut felt shapes, brads, ribbons, and sparkly embellishments you can use to dress up your gifts and impress your friends and family.


This cute tree is lit up with micro brads in primary colors and topped with a gold star.   I just love the message ribbons and "O' Christmas Tree" works perfectly here.


This white, lacy angel felt die cut has been painted and sparkled added with Stickles.  This is a very simple tag, just three elements:  "Joy" is stamped and embossed with clear embossing powder, our sparkly angel, and a message ribbon anchored with stars that have been stained with butterscotch alcohol ink.


This tag kind of evolved and the deep red and black colors gave it its theme.  I used die cut felt Christmas ornaments, black metal frames and "Merry Christmas" message ribbons.  I laid the message ribbon upside down inside the frame and then glued the words "merry" and "Christmas" cut and glued down.


Here's a suggested way to use your Christmas tags.  I made a smaller, matching tag with a name to identity who the gift is for.  Everybody will know who its from!!


I think this one is my favorite.  Maybe because that's a photocopied picture of our son when he was a kid on his skateboard.  I love the idea of using photos to identify who gifts are for and your recipient gets a little bonus gift, too.  

~~~~~~~~ 

Watch this blog next week for the second set of ideas for using your Creative Impressions embellishments to decorate your Christmas gifts and cards.  


Wednesday, November 8, 2017

I just LOVE you!!


I'm in Texas right now visiting family and wanted to make a quick blog post before I head out for the day.

These cute felt die cuts from Creative Impressions make it easy to create a quick, pretty card with lots of dimension and personality.  Use your alphabet stamps to complete your phrase and the sky is the limit:

the LOVE of my life
LOVE that new baby!
what the world needs now is LOVE
I LOVE your smile
all you need is LOVE
and so many more!

This card combines:
Felt Flowers
Web Ribbon cut into circles
Heart Fasteners
LOVE felt shapes (with red stickles)


Simple & pretty.  Use multi colors, if you prefer.  The LOVE felt shapes set you up for Christmas cards, Valentines cards and any card that is sent with LOVE!

SaveSave

Tuesday, October 17, 2017

Random Play

I had a chance to sit in my studio and just have a play recently.  No theme, no restrictions, just letting my imagination roam.  I love days like that, don't you?

I had just made up a bunch of layered flowers that were scattered on my desk.  The Pewter Screw Top brads are favorites for flower centers.  The Creative Impressions flowers are Sheer Blossoms & Leave and Felt Blossoms & Leaves, which makes such an interesting texture.


 Both Sheer Blossoms & Leaves and Felt Blossoms & Leaves
come in Small, Medium & Large
and in Tropical, Pastel, Heritage & Bright colors.  I mixed sizes, colors, and materials in making these flowers.

Flower Centers:
Metallic Mini Spiral Clips 85010
Pewter Screw Top 90000
White Mini Round 90111 

Trimmed Layer:
Black Web Ribbon
Gold Glitter Ribbon
Rick Rack

-------

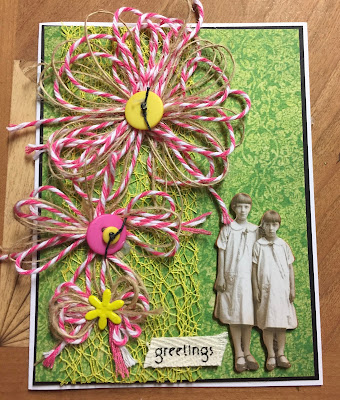
I dropped one of these Twine Flowers on a bit of yellow web ribbon and liked what I saw.  So cool when you accidentally find color combos that make you smile.


More twine flowers paired with a vintage image from Tim's Paper Dolls.  Creative Impressions new buttons make pretty flower centers.  I really liked these bright colors contrasted with black & white images.  

Thin Twine 80604 & Baker's Twine
Yellow Web Ribbon 
____ Buttons
Birthday Greetings Twill Expressions (with "birthday" snipped away) 80471
Tropical Funky Flowers paper fasteners 90663 

----------

Lesson learned: Clean up your work space from time to time, but don't clean it too much.  Those random bits that you keep in front of you can give you a kickstart for a Random Play Day!

Tuesday, October 10, 2017

F a l l i n g L e a v e s . . . . . .


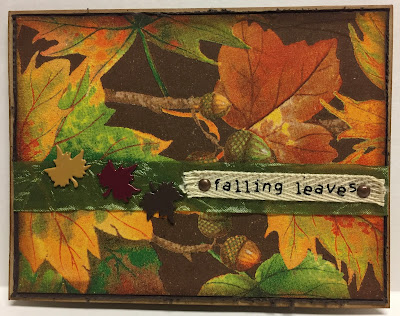
One of my very favorite things about personal, handmade cards is that you can send, not just a birthday card, but a FALL birthday card.  I've got several October and November birthdays on my calendar (twelve, to be exact!!) and I love that I can make their birthday cards special and personal with fall themed embellishments.

  Creative Impressions has an excellent selection of autumn themed and colored embellishments for fall birthdays and other occasions.  


Below you'll find a tutorial for making these colorful cards.


Last week I went to a meeting where we were served finger foods along with these gorgeous fall napkins.  I try, as best as I can, to hoard the napkins without being noticed!!  This technique to make cards using napkins can be really fun to send a thank you note for a birthday or other celebration using the napkins from the event.  


Separate the layers of the napkin.  They are generally three ply, so make sure the printed layer has no white layer attached.  If it is, you'll end up adhering the white layer and not the printed layer, which is what you want.


Layer a cut piece of card stock, then a layer of a trimmed piece of a Zip Lock (or other brand) bag, then the napkin, as shown.  I find it easiest to cut the plastic a bit larger than the card stock and the napkin a bit larger than the plastic.  Each layer should completely cover the layer below.


Funny story:  I learned this technique using kitchen plastic wrap, like Saran Wrap.  I taught this at my store and people were having trouble with it.  The layers weren't adhering well.  We figured out we had "microwave safe" plastic wrap.  No good for this technique!!  What we want is for the plastic to melt and microwave safe plastic is engineered NOT to melt.  The plastic used for Zip Lock bags melts and is thicker and I like it better for this technique.  You may have other plastic materials in you house that would work, as well.


Sandwich your layers and then iron on the hottest setting, dry heat.  If the napkin layer completely covers the layer below, you won't have to worry about melted plastic on the iron.  I've done this covering the whole thing with a paper towel, but I think it works best without it so that the heat is directly applied to the napkin.

I used my folded cotton "inky binky" for an ironing surface.  If you pull up the layers while still warm, any melted plastic on the cotton surface pulls away easily.


Give the layers a few seconds to cool.  When you can handle them easily, trim away the excess material.  


Creative Impressions felt leaves come with a hole at the end of the stem for fastening with a brad.  Sometimes I use this and sometimes I cut it off.  


I cut them off for this card and thought they could be used for a little extra detail.  They looked like washers to me, so I layered them behind the brad head.


I LUUUUV how pliable the metal used for Creative Impressions brads are.  These leaves bend easily and give a fluttering, natural look.


You may not be able to see it well in the photograph, but this card has this pretty fall leaf ribbon layered over a green grosgrain ribbon.  Love how Creative Impressions ribbons can be layered and used together.


Instead of trimming excess material with scissors, I tore away the excess around the edge of the card stock.  Just a way to get a different look for this card.  Antique copper frame, maple leaf, and brads combine for an elegant focal point, and cork paper sets it off!

Its so easy to use Creative Impressions embellishments to add more detail to make your cards special for the special ones in your life!


Thursday, September 28, 2017

One Design - Six Different Cards


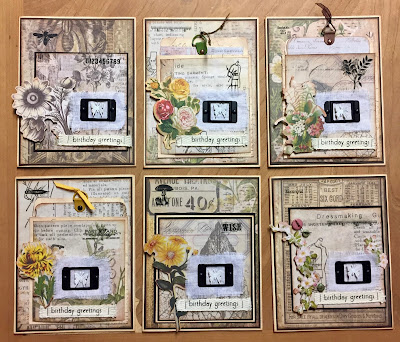
Every now and then I have a day in the studio that just feels right.  I spend hours playing and in the end I think "that was a good day's work".  

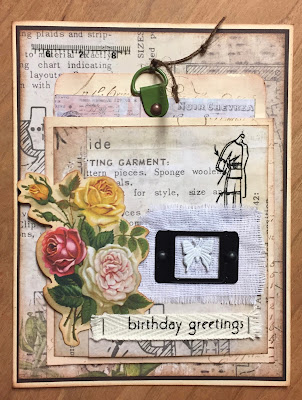
Creative Impressions embellishments worked really well here.  The little black frame popped on a frayed white bit of crinoline fabric, framing a glittery white butterfly fastener.  The butterfly wings are bent forward a little for dimension.  I stapled my "birthday greetings" from Creative Impressions message twill ribbon.  I absolutely love these ribbons.  A "impressive" selection and variety of messages makes them a real asset for your stash.

The paper is an all time favorite, Tim Holtz' "Wallflower Paper Stash".  The different colors and graphic elements in the pages called for a different spin on each card, but using mostly the same design elements.  The TH Botanical die cuts are a nice complement to the Wallflower papers.  Great way to use up your bits that you can't bear to throw away!

Close ups:


Monochromatic cards are always a favorite in my classes.


Some cards have a library pocket on front containing a decorated tag.


I love the matte, muted colors in Creative Impressions new button collection. 

I hope you're getting some play time and finding that satisfaction that comes from adding just the right embellishment!


Monday, July 24, 2017

Baker's Twine Flowers

Hey guys, Janet at Creative Impressions asked me to do a blog tutorial to show you how to make flowers with her Baker's Twine and Thin Jute Twine.
Here are the items you'll need.  Pretty simple, no?  The pasta fork is a great tool!  You can make different sizes of flowers and it keeps your loops a uniform size.
 Tape the end of the Baker's Twine and Thin Jute Twine to the back of the pasta fork.  The Baker's Twine by itself is pretty limp but the jute helps give it some body and hold shape.
Make several loops with both fibers and tape the end on the back of the pasta fork.  I did six loops.

 Cut a length of both twines to tie off the loops in the middle.  About 4 or 5 inches should do it.
Tie off in the middle nice and tight.  Release the loops from the fork.
 Fluff the loops out and repeat.  You'll need two of these.
 Overlay one set of loops on the other, one horizontal and the other vertical.  Glue together with a little matte medium.
I stamped a large round paper fastener with tiny script.  On the left is the paper fastener as they come in the package.  I spread the pins to accommodate the thickness of the flower and make a flower center.

Have a little fun today and "create" your own garden of flowers with Creative Impressions embellishments!

SaveSaveSaveSaveSaveSaveSaveSave

Friday, February 10, 2017

❤︎ Love ❤︎


Happy Valentine's Day, lovers everywhere!  Valentine's Day is almost upon us and "love" is the perfect theme for February.  Not only because of Valentine's Day but because what the world needs now is love, sweet love, no?


I sort of got carried away with this theme.  I kept creating and each creation meant of few cast off things that didn't work for that project, so I had to start another to use all my ideas up.  I'll be posting some of my other pieces on Facebook over the next few days.

The old photo of this couple is such fun.  It spoke to me of  young love and the beginnings of a life together.  So I kind of invented a story for them and told it on this art journal page.


My other inspiration for this page was this lyric from Eric Clapton.  Let it Grow is a really catchy, soulful, George Harrison-y song, easy and relaxed.


I did want to experiment a bit with the idea of spreading out embossing paste with my finger for a thin layer on a background.  This is Wendy Vecchi's Embossing Paste tinted with DecoArt Payne's Grey Media paint.  I like the effect and that it felt good to work with my hands and not just use tools to apply medium.  Dampen your fingers a little or the paste will stick to them.


Thinlets Greenery Dies worked beautifully here.  I could cut a lot of them in one pass and got the wild, overgrown, "let it grow" effect I wanted.


This is the train ticket this couple took on their honeymoon.  Creative Impressions triangle clip and metal tag make the embellishment.  I hammered the names into the metal tag, rubbed black paint into the recessed letters and then wiped away the excess paint.  I then dabbed on a just bit of Espresso Distress paint with my finger.

~~~~~~

Who's getting a valentine from you??  We've got so many new friends on Creative Carte Blanche.  Take some pics of your work and share them with us!  Just use the InLinkz button on the Creative Carte Blanche page, located just below art for the current theme.