Birds & Words

Tuesday, February 27, 2018

Ready for SPRING!!


As usual, I am WAY ready for spring and making it harder to wait because I start thinking about it really early.  But for those who want to know, the first day of spring is three weeks from today!!

I'm posting today a few cards featuring Creative Impressions twine.  I luv this stuff and use it regularly for sewing, tying off ribbons and tags, and layering with ribbons to give them more body when I tie bows.  Its got a great organic earthiness which I like to incorporate into my work.

In this first card I used CI twine in a natural color to embellish twill ribbon with sewn "x's", french knots on the little cotton frame and tying a knot on the yellow button to unify the whole piece.


This could be a valentine, but works well anytime.  I borrowed from the "hello" in the background paper and stitched the word on a simple cotton panel, outlined a Bits of Bling heart and x's at the corners to visually anchor the front panel.


I love using this paper piecing technique.  I take some strips of patterned papers, scratch up the edges and piece them over a black card stock panel.  Then, pulling colors from the patterned paper, I stitched stems and a border with CI twine and used Bits of Bling flowers and pearls.  


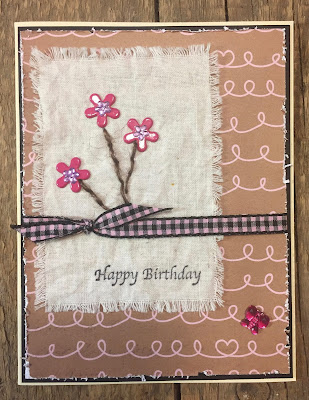
This is a similar card using flower brads with Bits of Bling as centers for the flowers.  A little pink Bits of Bling butterfly at bottom right finishes the piece.


Here are the papers I started with.  The top two are both sides of a double sided paper and the bottom to are coordinating papers from a paper stack I picked up someplace.

Tuesday, January 9, 2018

LOVE Makes the World Go 'Round


Anyone else beginning to think about Valentine's Day?  After all the last minute press to get out my Christmas cards, I look forward to getting a nice head start on making valentines!

Not much technique today, just a quick blog post.  A simple globe die cut, some alphabet stamps and a felt die cut "Love" from Creative Impressions Heart Felt Assortment are layered onto a 6 x 6 card.

So there's a simple valentine for you today.  My word this year is "simplify" and its already giving grace to my life.  When I find myself on Amazon, tossing stuff in the cart, I remember "simplify" and delete everything.  When I'm stressing over too many rooms to vacuum and wild dust motes that refuse to be tamed, I remember "simplify" and enjoy watching them dance in the ray of sunshine.  When I look at today's task list and know I'll never get through it all, I remember "simplify" and just pick three and let the rest go back to sleep till I'm ready for them.

Maybe I'll do a project soon using "simplify" as my theme and inspiration.

What's your word?

Tuesday, January 2, 2018

Creative Impressions Snowflake Pocket Tags


Happy New Year everyone!  We've made it through Christmas and bring it on 2018!!  I've begun the New Year by creating this sparkly cold winter pocket tag card.  Creative Impressions makes a variety of snow flake embellishments that layer beautifully to mimic the magic of fresh snow.  I love sending personalized birthday greetings to friends who have winter birthdays!

Hope you enjoy this tutorial.


I used masking tape to join two #8 manila shipping tags.


I folded them together and and adhered them with another line of masking tape.


I painted the tag front with gesso.  While the gesso was still wet, I pressed Creative Impressions Felt Snowflakes onto the tag.  Cream or white is best.


Now a layer of DecoArt Media Crackle paint.  Best to let this dry naturally to get a nice fine crackled surface.


I thinned a pea sized dot of Cerulean Blue DecoArt Media acrylic paint two pea dots of Ranger Multi Medium Matte.  I dry brushed this over the surface of the tag and felt snowflakes.


I layered up a mixture of Felt Snowflakes, Shimmer Snowflakes, and Snowflake Paper Fasteners.  I didn't use everything I prepared and I'll have some extras for another tag or a starting element for a new card.  I keep a "starter basket" of thing like this to get me going on new projects.


Arrange snowflakes on the tag in a random, snowflake falling fashion.  I added some silver glass glitter on the brads later for more sparkle.


Sweet message ribbons tied at the top add to the cold blue winter feel.


I sealed the bottom of the two tags, leaving the right side open for a gift card.


Creative Impressions silver frame over a rubon completes the birthday message.

~~~~~

I'm a summer girl but appreciate these cold days when I want to stay inside and just create.  I've found a new way to organize all my Creative Impressions embellishments that I'll share on an upcoming blog post.  Stay warm, friends, and create art!!


Tuesday, December 5, 2017

A Creative Impressions Christmas - Part II

Today I want to share just a few more ideas for a Creative Impressions Christmas!  I'm using more Creative Impressions die cut felt shapes.  A lot of us have die cut machines, but these shapes are so intricate that its awfully nice to just buy them precut.  This cute little deer from the Felt Shapes Christmas collection makes a sweet little Rudolph on your Christmas tags and packages.  Just add a sparkle to his nose and he's ready to leap into the air!

Here I used Faded Jeans Distress Oxide ink.  Creative Impressions embellishments include Star Bling, Bright Smooth Circle Bling, Merry Christmas Twill Expressions, and white Micro Rounds.  A scrap of crinoline frames the "Merry Christmas" message.


Use Creative Impressions to decorate your packages!  Our little Rudolph is adorable against layered 1/4" Red Glimmer Ribbon and 1" Red Blank Grosgrain Ribbon.  Lay out your ribbon layers and fasten them together with white Micro Rounds.  Wrap around your white gift wrapped package adhere in the back, then glue down Rudolph.


I used gold embossing paste on a tag through a Tim Holtz Gothic stencil, spritzed the stencil with water and applied this second generation of gold embossing paste on this tag.  An assortment of Felt Snowflakes and Felt Christmas Ornaments secured with Micro Rounds on this "Winter Wonderland" Creative Impressions tag.  A Natural Mini Clothes Pin clipped to the message complete it!

~~~~~~~~~~~~~

I hope you have fun decorating your packages this year. 
A very, very merry Creative Impressions Christmas to you all from Jan, Susan and Cheryl!


Thursday, November 30, 2017

Its a Creative Impressions Christmas!! - Part I

Confession time.  My favorite thing about Christmas?  Well, apart from time with family its got to be wrapping gifts.  I LOVE wrapping gifts.  I think the gifts under the tree are a part of my Christmas decorations and I want them to be beautiful.  I love pretty packages so much that what's inside is usually a disappointment because I wrap the simplest, insignificant gifts in an elaborate, expensive looking way.  Oops.  

Creative Impressions has some super cute die cut felt shapes, brads, ribbons, and sparkly embellishments you can use to dress up your gifts and impress your friends and family.


This cute tree is lit up with micro brads in primary colors and topped with a gold star.   I just love the message ribbons and "O' Christmas Tree" works perfectly here.


This white, lacy angel felt die cut has been painted and sparkled added with Stickles.  This is a very simple tag, just three elements:  "Joy" is stamped and embossed with clear embossing powder, our sparkly angel, and a message ribbon anchored with stars that have been stained with butterscotch alcohol ink.


This tag kind of evolved and the deep red and black colors gave it its theme.  I used die cut felt Christmas ornaments, black metal frames and "Merry Christmas" message ribbons.  I laid the message ribbon upside down inside the frame and then glued the words "merry" and "Christmas" cut and glued down.


Here's a suggested way to use your Christmas tags.  I made a smaller, matching tag with a name to identity who the gift is for.  Everybody will know who its from!!


I think this one is my favorite.  Maybe because that's a photocopied picture of our son when he was a kid on his skateboard.  I love the idea of using photos to identify who gifts are for and your recipient gets a little bonus gift, too.  

~~~~~~~~ 

Watch this blog next week for the second set of ideas for using your Creative Impressions embellishments to decorate your Christmas gifts and cards.  


Wednesday, November 8, 2017

I just LOVE you!!


I'm in Texas right now visiting family and wanted to make a quick blog post before I head out for the day.

These cute felt die cuts from Creative Impressions make it easy to create a quick, pretty card with lots of dimension and personality.  Use your alphabet stamps to complete your phrase and the sky is the limit:

the LOVE of my life
LOVE that new baby!
what the world needs now is LOVE
I LOVE your smile
all you need is LOVE
and so many more!

This card combines:
Felt Flowers
Web Ribbon cut into circles
Heart Fasteners
LOVE felt shapes (with red stickles)


Simple & pretty.  Use multi colors, if you prefer.  The LOVE felt shapes set you up for Christmas cards, Valentines cards and any card that is sent with LOVE!

SaveSave

Tuesday, October 17, 2017

Random Play

I had a chance to sit in my studio and just have a play recently.  No theme, no restrictions, just letting my imagination roam.  I love days like that, don't you?

I had just made up a bunch of layered flowers that were scattered on my desk.  The Pewter Screw Top brads are favorites for flower centers.  The Creative Impressions flowers are Sheer Blossoms & Leave and Felt Blossoms & Leaves, which makes such an interesting texture.


 Both Sheer Blossoms & Leaves and Felt Blossoms & Leaves
come in Small, Medium & Large
and in Tropical, Pastel, Heritage & Bright colors.  I mixed sizes, colors, and materials in making these flowers.

Flower Centers:
Metallic Mini Spiral Clips 85010
Pewter Screw Top 90000
White Mini Round 90111 

Trimmed Layer:
Black Web Ribbon
Gold Glitter Ribbon
Rick Rack

-------

I dropped one of these Twine Flowers on a bit of yellow web ribbon and liked what I saw.  So cool when you accidentally find color combos that make you smile.


More twine flowers paired with a vintage image from Tim's Paper Dolls.  Creative Impressions new buttons make pretty flower centers.  I really liked these bright colors contrasted with black & white images.  

Thin Twine 80604 & Baker's Twine
Yellow Web Ribbon 
____ Buttons
Birthday Greetings Twill Expressions (with "birthday" snipped away) 80471
Tropical Funky Flowers paper fasteners 90663 

----------

Lesson learned: Clean up your work space from time to time, but don't clean it too much.  Those random bits that you keep in front of you can give you a kickstart for a Random Play Day!